vrCAVE Standalone
We offer a “Standalone” version of our software which has been specially redesigned for an optimal experience on the Pico 4 Ultra headset. This guide was written using the Pico 4 Ultra Enterprise Headset. If you are setting up another Pico headset, There may be some differences.
Hardware Requirements
-
Pico Headset with Controllers
- Recommended 5 sets (plus 1 backup)
- one USB-A to USB-C sync cable
-
Windows Computer
- OS: Windows 10
- CPU: anything above a PassMark Score of 7,700
- Graphics: anything above a PassMark Score of 8,800
- RAM 8Gb minimum, 16GB or more recommended
- Peripheries: Ethernet port, ports for mouse, keyboard, and monitor
-
Router
- Netgear Nighthawk X6 R8000 Tri Band Gigabit Wireless Router (or similar)
- Recommended 2 bands of 5GHz (in case of future side by side rooms setup)
- Connection to the internet is recommended
Room Requirements
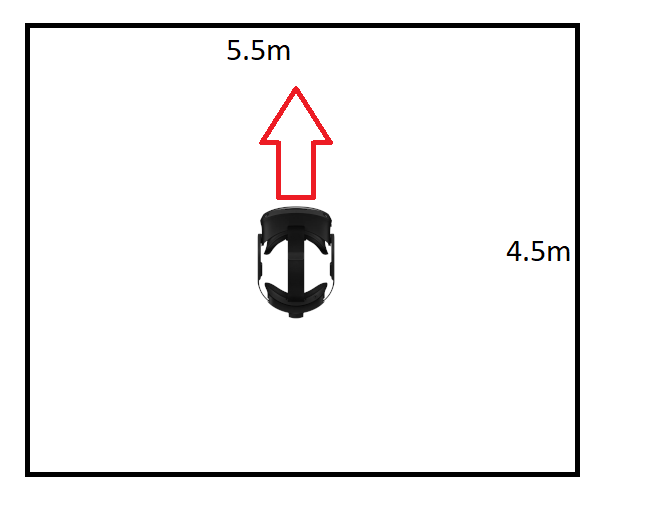
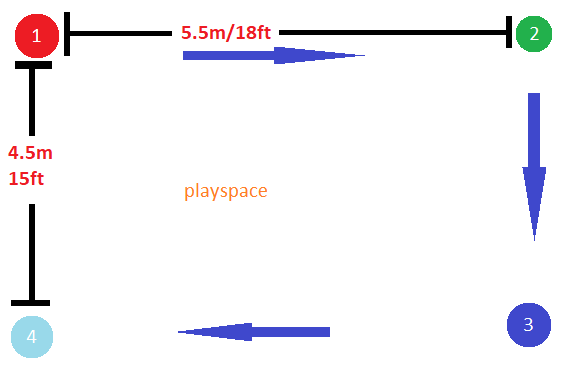
vrCAVE Standalone requires a play space of 4.5M x 5.5M (15’x18’) . We recommend having at least an additional 50cm (20”) of buffer beyond this to reduce the danger of bumping into walls.
Make sure your headset’s boundary is set up so you can walk freely around the entire 15’ x 18’ (4.5m x 5.5m) space.
Achieving Optimal Tracking
A brightly lit room is important for the Inside-Out tracking. Inside-Out also requires some room features to help with its visual insight tracking, posters or banners should be enough for the walls, the floor may be a bit more complicated. An example of a good tracking floor is a carpet with a non-symmetrical design or carpet tiles of different colors. If that isn’t possible, you can also mark the floor with some painters tape or duct tape. as long as the markings are non-symmetrical and visible when viewed in the headset passthough mode shouldn’t have any troubles tracking.
Currently, the Pico 4 Ultra enterprise headset has way to evaluate your playspace for tracking efficiency. This can be accessed from the LBE Business settings, which will be covered in this guide.
(These suggestions are subject to change as Inside-Out Tracking continues to develop.)
Location Based Entertainment (LBE) mode
Quick Setup
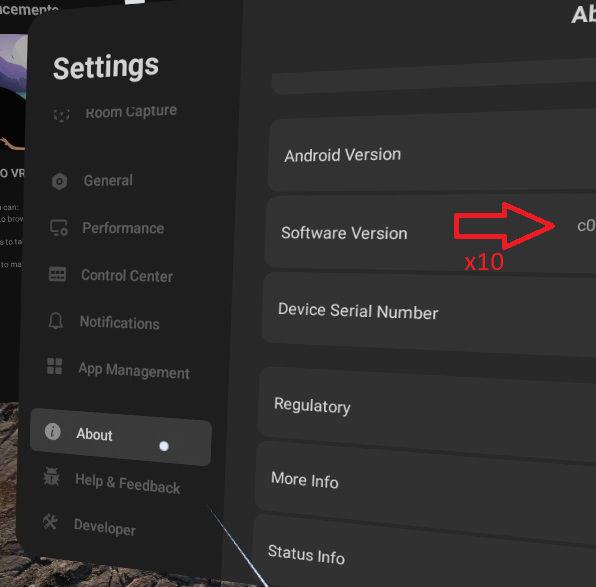
- Navigate to the headset settings About page, unlock the Developer settings by clicking on the software version ten times.
-
Go into the Developer settings and select LBE
-
Select Create Map. Follow the instructions the Pico headset provides, The Map creation process is very user friendly.
-
When it asks you to Calibrate origin and Forward direction, you want the origin to be the center of your playspace and the forward direction is facing one of your 5.5m walls. once placed, you can grab the origin to more precisly reposition it, you can also grab the forward direction vector with your controllers laser pointer to make small adjustments.
-
At the Create Boundary step, select Place Vertices to Create Boundary this will allow you to make a more clean looking boundary. To avoid the pico boundaries from appearing when players are within the valid playspace, draw your vertices on the physical walls of your playspace. Players will still receive a warning if they get too close to real walls.
-
The next step will be to step into the sections that the Map creator divides the playspace into and look at each of the square grids until they disappear. do this until all the blue squares are gone and you see a Orange/Red track appear on the ground, you will walk along this track and as you do it will turn green, continue to follow the track looking around in the headset until it is completed. Repeat this process is all the sections to complete the map data.
-
Once you are done creating the map, it will ask you if you want to export the map to your device manager, Select Save Locally.
-
Plug your headset into a PC to access the headsets files. Copy the maps folder found in the root of the headset internal storage to you PC.
-
Plug in your next headset and copy the maps folder into this headsets internal storage.
-
Open the developer settings in this headset and select Import map. select the map file that comes up.
-
repeat the last 2 steps for all your headsets.
Map Creation
-
Go into the Developer settings and select LBE
-
Select Create Map. Follow the instructions the Pico headset provides, The Map creation process is very user friendly.
-
When it asks you to Calibrate origin and Forward direction, you want the origin to be the center of your playspace and the forward direction is facing one of your 5.5m walls. once placed, you can grab the origin to more precisly reposition it, you can also grab the forward direction vector with your controllers laser pointer to make small adjustments.
-
At the Create Boundary step, select Place Vertices to Create Boundary this will allow you to make a more clean looking boundary. Draw your vertices along your playspace, providing at least 20-30cm of space from any physical walls so players get a warning before reaching the walls.
-
The next step will be to step into the sections that the Map creator divides the playspace into and look at each of the square grids until they disappear. do this until all the blue squares are gone and you see a Orange/Red track appear on the ground, you will walk along this track and as you do it will turn green, continue to follow the track looking around in the headset until it is completed. Repeat this process is all the sections to complete the map data.
-
Once you are done creating the map, it will ask you if you want to export the map to your device manager, do this so you can upload it to the rest of your headsets.
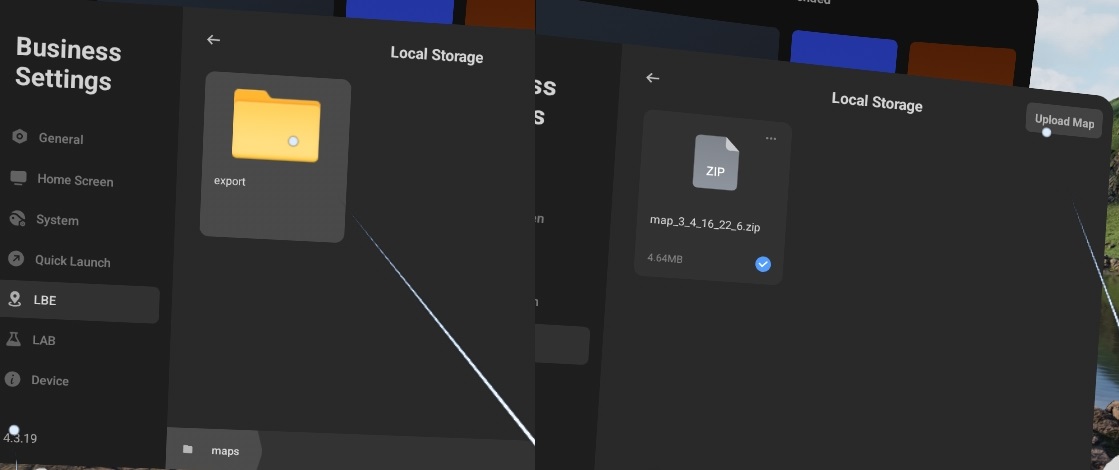
- If you did not set up the device manager, you can simply plug the Pico into your pc to access the internal storage and copy the map folder to your other headsets. Once you have copied the map data to the other headsets. access the LBE settings and Import the created map.
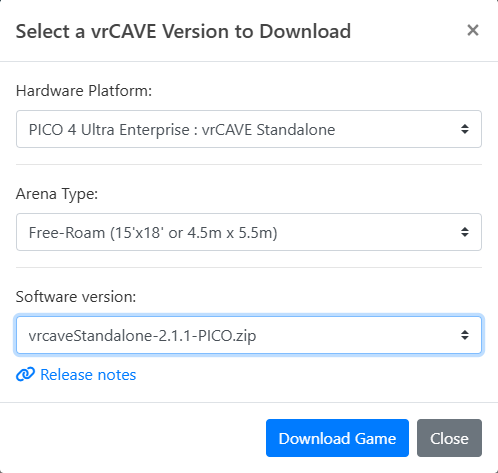
Downloading the Lastest Version
-
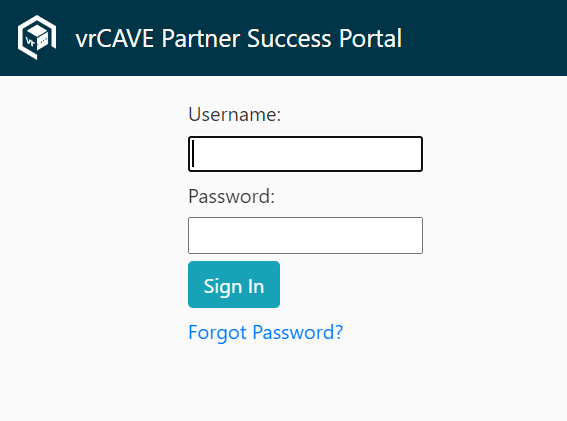
Go to the Partner Success Portal
-
Log in using the Login credentials provided by VRCave
-
Find the “Download Latest vrCAVE Version” Button

-
Select the Download details that best describe your VR Setup
Installing (Sideloading) the VRcaveLibrary app on to your PICO
PLEASE NOTE
Your file path to the vrcave software should to be free of any spaces.
- Bad: C:\Windows\Username with spaces\Desktop\Some folder with spaces\vrcave
- Good: C:\Windows\UsernameWithNoSpaces\Desktop\vrcave
Make sure your headset is connected to your Windows PC via USB.
-
Download the
vrcaveStandalone-2.x.x-Pico.zipfrom the provided link -
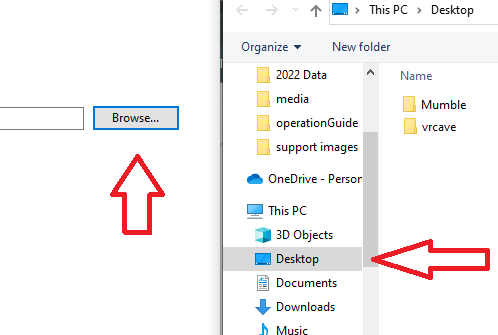
Right click on the .zip and choose Extract All
-
In the Extract Compressed (Zipped) Folders window, choose Browse, select Desktop, and then Select Folder.
-
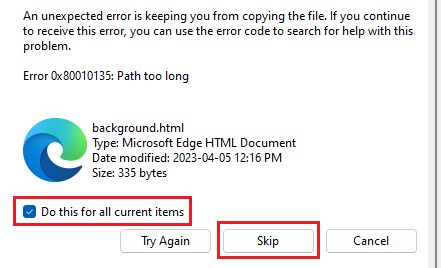
Click Extract and wait for the folders to finish extracting.
NOTE: If you get an error while extracting the that a path is too long, choose “Do this for all current items” and click “Skip”.
-
Navigate into the
vrcave\Android_ASTC\folder and double-click on Install_VRcaveLibrary-arm64.bat.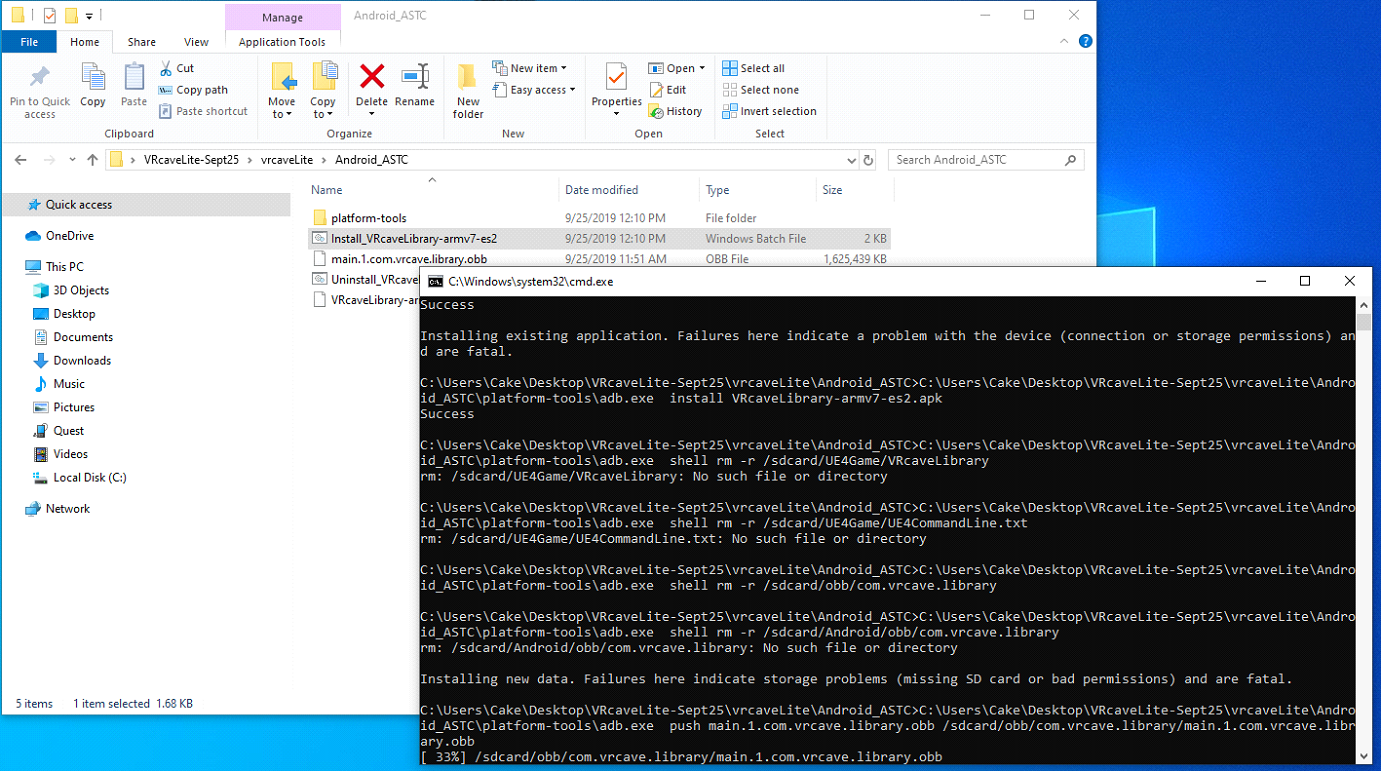
-
It should take 2-3 minutes - if the install completes successfully, the window will close with no further feedback.
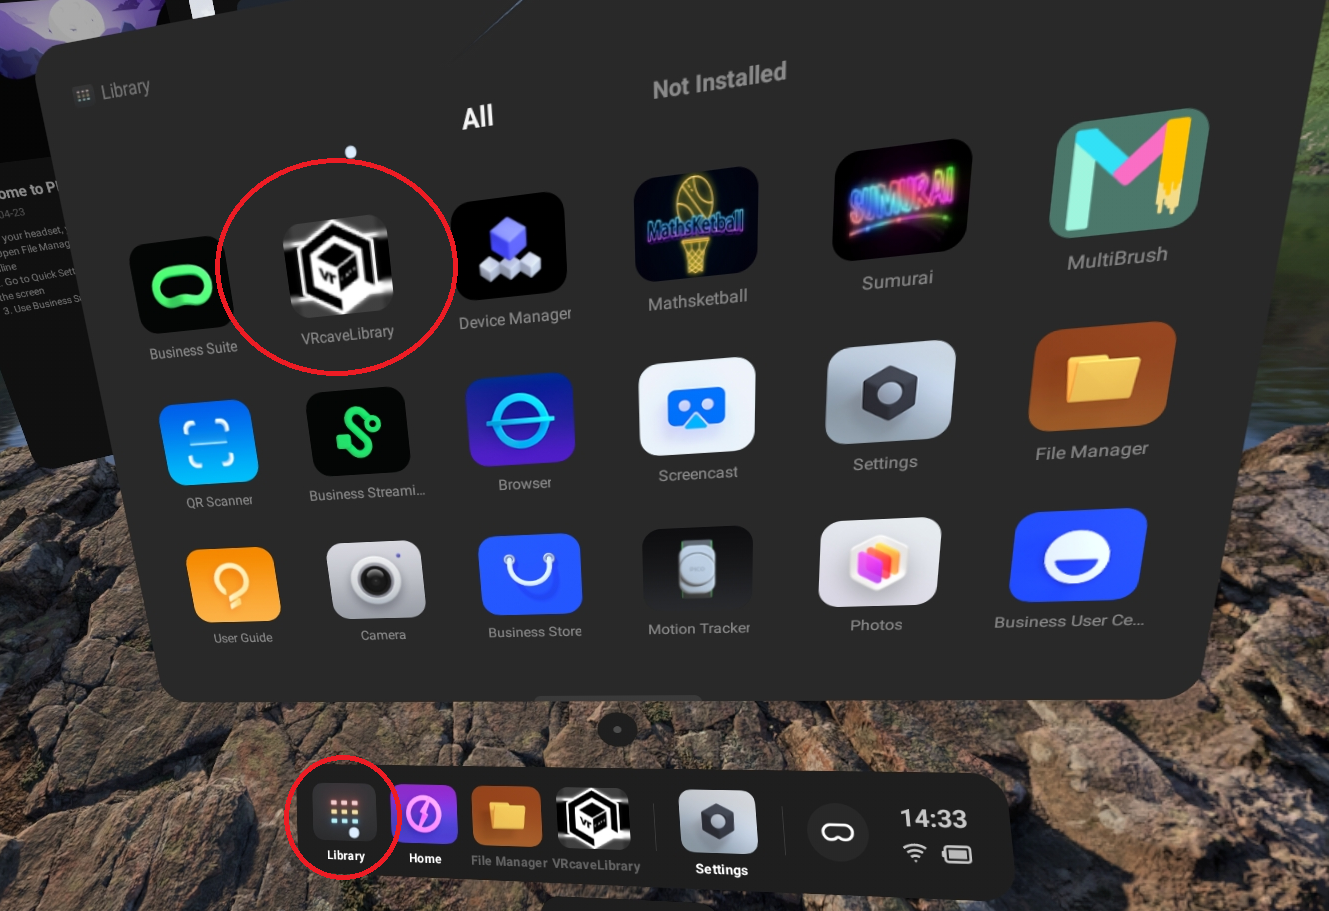
Launching VRcaveLibrary on Pico
In VR, from the main menu bar at the bottom of the screen, click on the Library Button, In the Library window, you should see VRcaveLibrary
Setting up the Server Computer
-
Double-click the
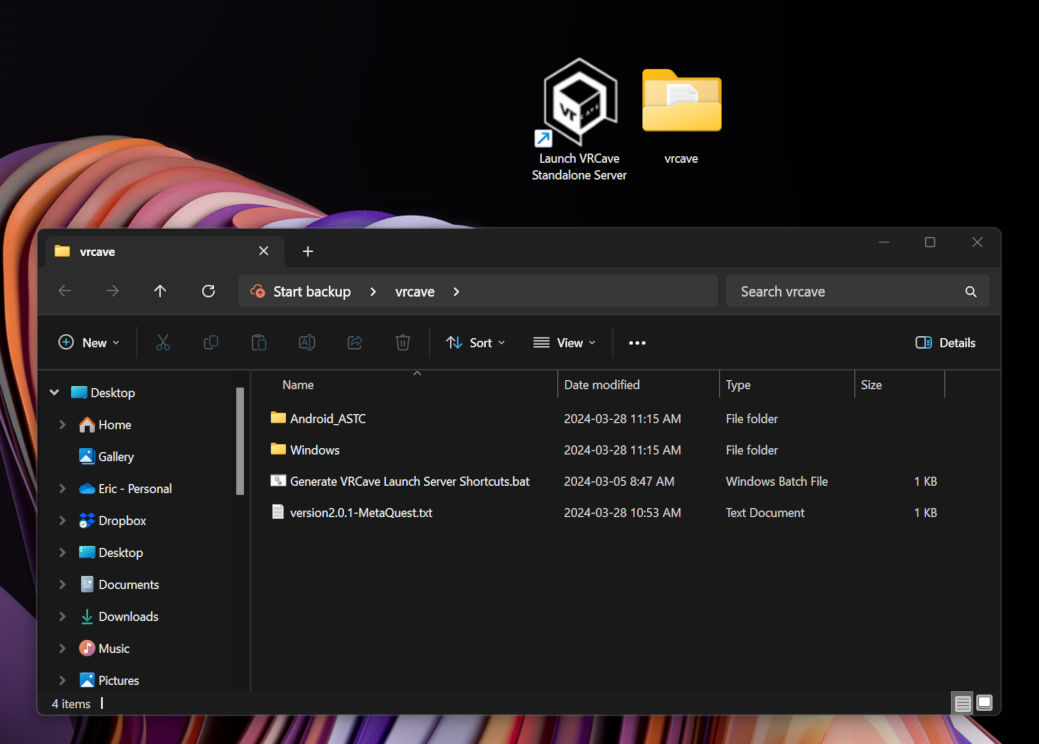
vrcavefolder on your desktop, then double-click Generate VRCave Launch Server Shortcuts.bat.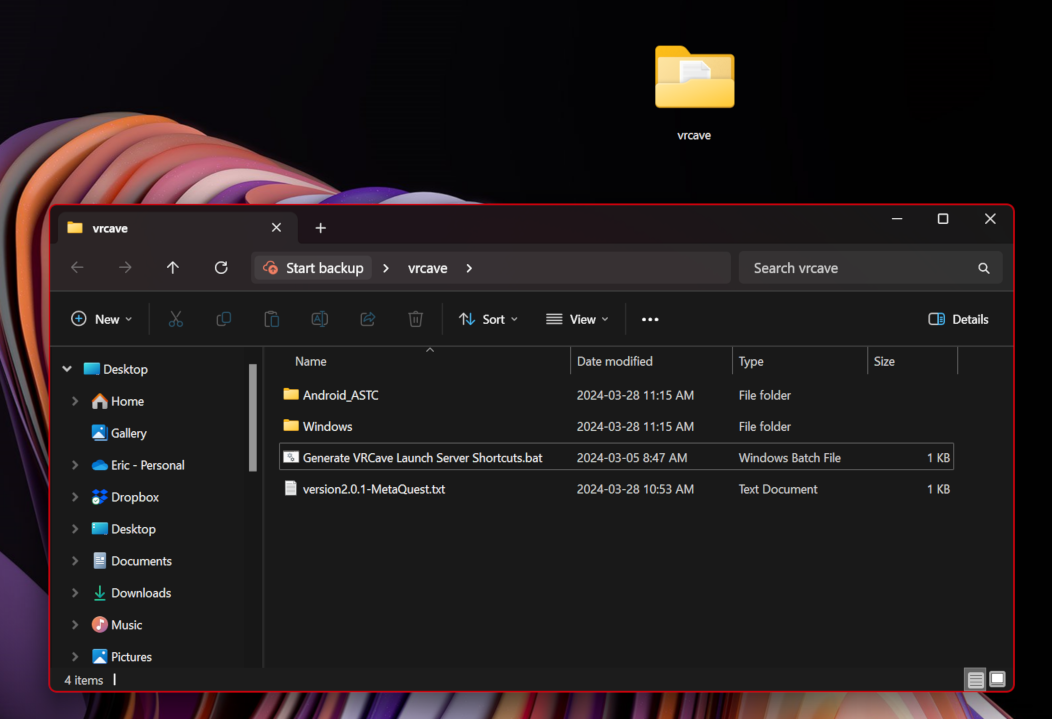
A new shortcut should appear called “Launch VRCave Standalone Server”:
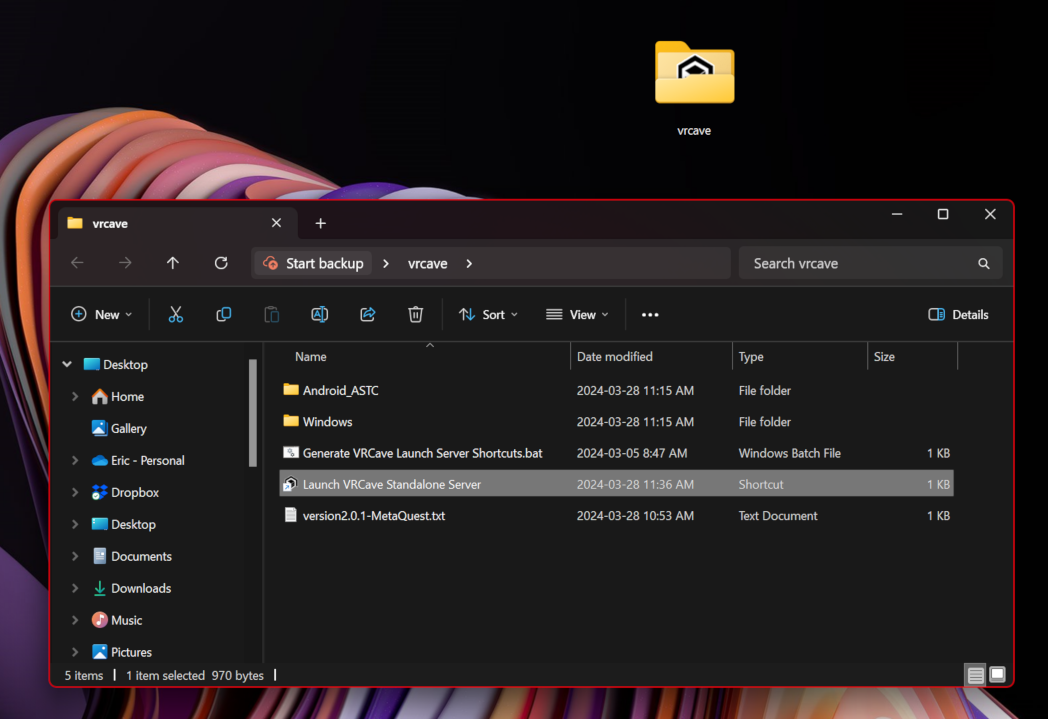
-
If you like, you can drag this shortcut to your desktop:
-
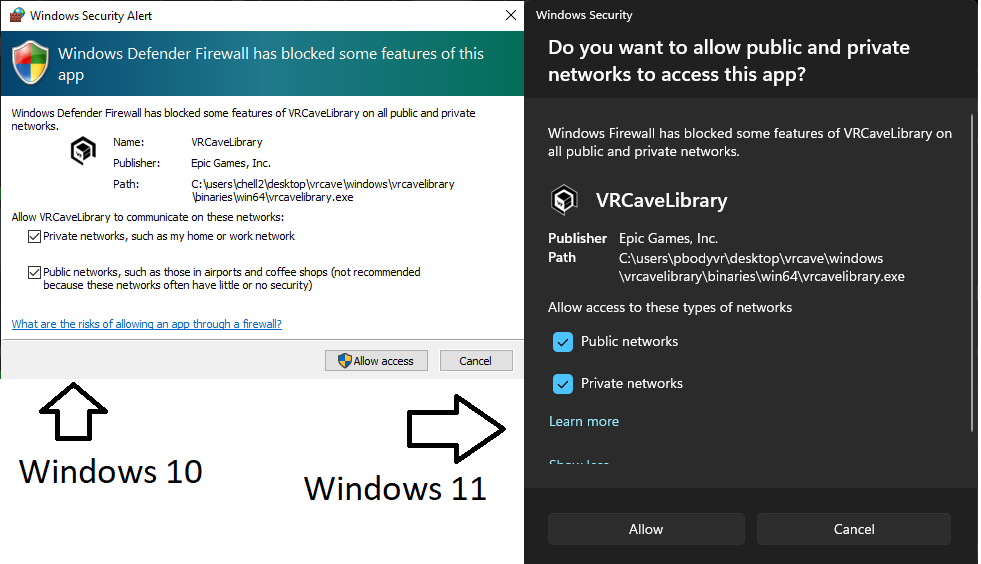
On launch, you should see a windows defender popup, select both private and public networks and then click Allow
-
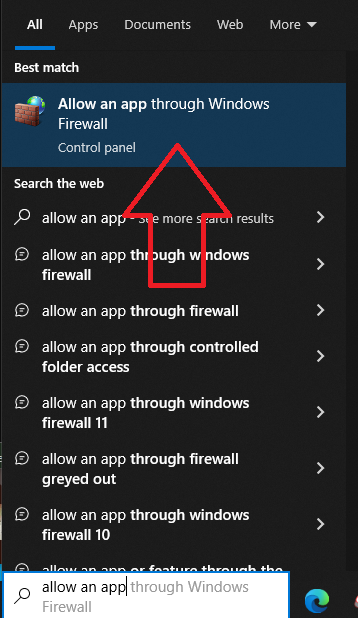
If you do not get any of these popups, you can create an exception for vrcave by typing “Allow an app through Windows Firewall” into windows search bar and selecting the option that comes up
-
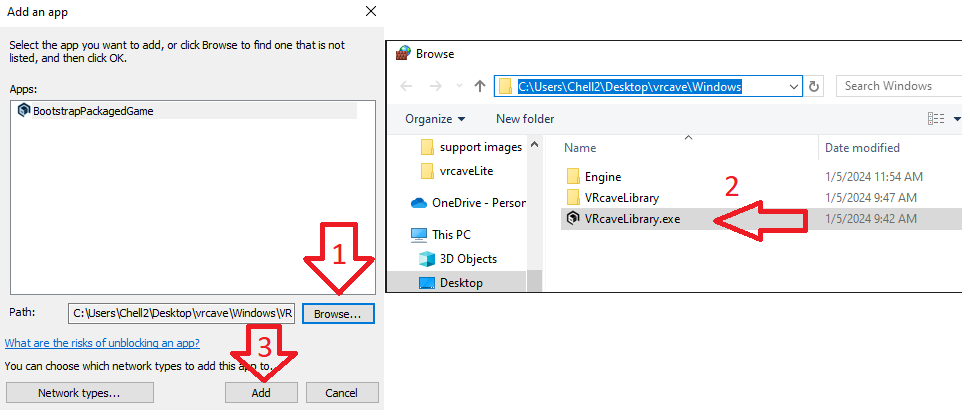
Then make sure that all 3 checkboxes for vrcavelibrary are checked

-
If it is not in this list, click Allow another app… and then Browse…
-
After adding BootstrapPackagedGame, make sure it has all 3 boxes checked and then click okay
-
If you get an error that says some .dll files cannot be found, you may need to update your DirectX drivers
Router Setup
The server computer communicates game data to the VR Headsets, this is done by setting up a local network with this router for the server computer and VR headsets to all be on. Having the headsets connnected to the internet will allow them to update their firmware and software which allows for improvments to tracking and other features.
-
Connection: Make sure your Nighthawk Netgear X6 R8000 router is plugged in and powered on. Use its provided ethernet cable to connect the server computer to LAN port 1 on the back of the router (do NOT plug it into the port titled “INTERNET“).
-
Connect the router to the internet by plugging an ethernet cable from a modem into the port titled “INTERNET“
-
Put the server computer in airplane mode so that it doesn’t have any WiFi internet connection anymore, and is only connected to the Nighthawk X6 router.
Network Environment
-
To connect the clients to the server, all the headsets and the server need to connect to the Nighthawk X6
-
In the headsets, On the main menu bar at the bottom of the screen, click on the Wifi Symbol or click the settings app and then the Wi-fi button. From there, find Router network you set up, it should be named something like NETGEAR##-5G-2. Enter the password provided for the router or the one you set up if you decided to do that.

-
Do this for each of the Headsets and then restart the VRcaveLibrary app
-
On the server computer, you should start to see players begin to connect on the top righthand corner of the UI, from there you can name the headsets and change the player color.
-
If the players do not show up, check to see if your server computer has any firewalls that might be blocking vrcavelibrary from accessing the network. For Windows Defender Firewall, you can allow vrcave through by searching “Allow an App through Windows Firewall” in a windows search bar and adding vrcaveLibrary.exe to the allowed apps. vrcaveLibrary.exe can be found in vrcaveLite/WindowsNoEditor/ folder. Any other firewalls should just be disabled as they will usually try to block vrcave even after permissions are granted.
In Game Calibration
If you have Pico Enterprise headset and enabled LBE mode, this step is not necessary.
-
To make sure that each player is where they are supposed to be in game, you will need to perform a calibration on each headset, you can start the calibration from the server by clicking on the gear next to the player name and then clicking the crosshairs that appear when the gear is clicked.
-
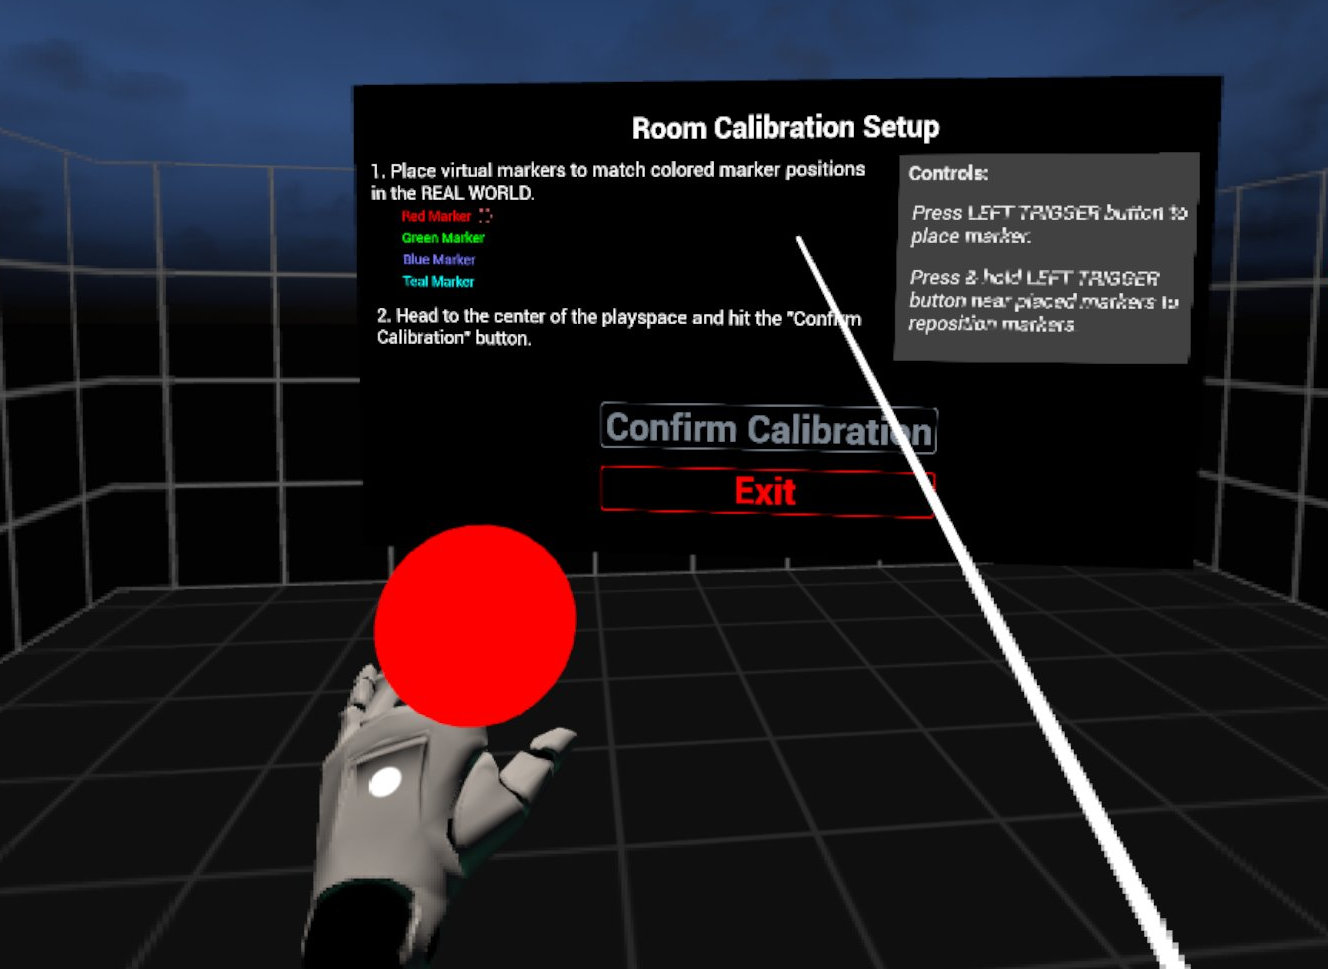
In the selected headset, you will see the calibration window pop up and a red ball attached to the left hand.
-
You will need to touch the controller to all 4 corners of the room like the diagram below, It helps to mark out the corners with numbers so the first corner can be quickly identified when calibration needs to be done. You must place the markers in the corners on the floor of your real world space as the calibration also sets the games floor height. You will need to keep the headset on, while also looking out from under the headset to see where you are going.
-
When you are done, point the laser pointer on the right hand at the Confirm Calibration button, the play area should visibly shift into position, you can test the calibration by performing a “high five” with another player who is calibrated in the game, you will know the calibration worked if the controllers clack against each other when your hands are close to each other. If the hands connect in game but miss In real life (or using the professional VR Developers term: “Meat Space”) then the calibration was not successful and one or both of the players needs to calibrate again.
Optional Features
- By clicking on the players name on the server, you can type out a new name for that headset, the sever will remember that name next time that headset connects.
Pulling Logs from Headsets
-
Sometimes vrCAVE will request logs from a specific headset. Headsets only keep the logs for the most recent launch of vrcave, so if something happens in vrcave (for example, a crash) and vrcave is re-launched, the logs of that crash will be overwritten. So it is important to grab the logs after an event like that happens.
-
to access the headset files, you will need to plug the headset into a PC with a USB cable capable of data transfer, you can find the headset log files here:
This PC\PICO 4 Ultra Enterprise\Internal shared storage\Android\data\com.vrcave.library\files\UnrealGame\VRcaveLibrary\VRcaveLibrary\Saved
Changing the number of given hints and default time limit
-
Navigate to the vrcave library config folder by following this path: vrcave\Windows\VRcaveLibrary\Saved\Config\Windows\Game.ini
-
open Game.ini with notepad and add these lines:
[/Game/Maps/DragonTower/DragonTower_GameState.DragonTower_GameState_C]
defaultMaxGameTime=2700
defaultMaxHints=2

[/Game/Maps/Manor/Manor_GameState.Manor_GameState_C]
defaultMaxGameTime=2700
defaultMaxHints=2

[/Game/Maps/SST/SST_GameState.SST_GameState_C]
defaultMaxGameTime=2700
defaultMaxHints=2

[/Game/Maps/TimeTravel/TimeTravel_GameState.TimeTravel_GameState_C]
defaultMaxGameTime=2700
defaultMaxHints=2

[/Game/Maps/underwater/USA_GameState.USA_GameState_C]
defaultMaxGameTime=2700
defaultMaxHints=2

[/Game/Maps/Pirate/Pirate_GameState.Pirate_GameState_C]
defaultMaxGameTime=2700
defaultMaxHints=2

[/Game/Maps/RunawayTrain/RunawayTrain_GameState.RunawayTrain_GameState_C]
defaultMaxGameTime=2700
defaultMaxHints=2

[/Game/Maps/LaserBlocks/LaserBlocks_GameState.LaserBlocks_GameState_C]
defaultMaxGameTime=600
defaultMaxHints=2

[/Game/Maps/Ninja/Ninja_GameState_Quest.Ninja_GameState_Quest_C]
defaultMaxGameTime=2700
defaultMaxHints=2

[/Game/Maps/Alien/Alien_GameState_Standalone.Alien_GameState_Standalone_C]
defaultMaxGameTime=2700
defaultMaxHints=2
- defaultMaxGameTime is measured in seconds, so 2700 seconds is 45 minutes.